Start your engines!
Start your engines, makers. It's time to build a DIY cardboard race car!
Introduction
Ready, Set... Make!
This cardboard car is sure to get your motor running. With nothing but a couple of cardboard boxes and your trusty Makedo tools, the kids will have the ride of their lives in their very own cardboard race car built for a pro.
Featuring a sleek design including hub caps and a spoiler (so it can go REALLY fast), be sure to take pole position for a family race down the hallway.
Just don’t forget to use your brakes 😉
To build your own car, use the step-by-step guide below.
We've also included a handy video walkthrough that you can follow along with.
Video Walkthrough
Preparation
What you'll need
Scru-Driver Explore the range
Fold-Roller Explore the range
Safe-Saw Explore the range
Scrus & Scru+ Explore the range
Upcycled Cardboard
Find Cardboard
Source your materials
Start with 1x medium sized rectangular box and some additional cardboard.
Your box should be large enough to sit in. Fruit or vegetable boxes are perfect.

The Body
Make the frame of the car
Remove the lid, then use your Safe-Saw to cut the lid at two-thirds of the way along both sides. Follow the cutting line along the top of the lid to divide it into two sections.
The larger section will be for the front of the car, and the smaller section for the back.
Use your Scru-Driver to attach the front at an angle to the base of the box with a Scru on each side. Repeat with the back, adjusting the angle for a speedy profile.


The Wheels
Let's roll!
Find a round object to trace (we used a dinner plate) and grab your additional cardboard.
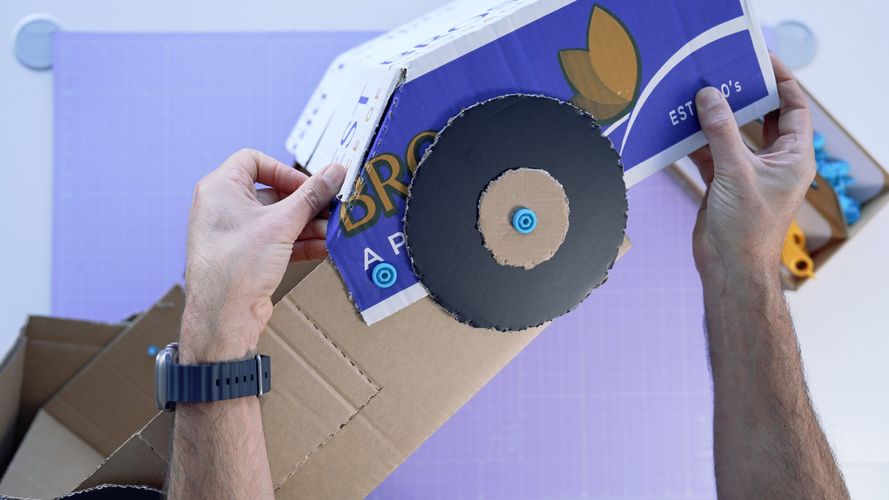
Trace the outline of the four wheels with a punch, then cut. Repeat the same process with a smaller circle to create four hubcaps. To trace these, we used a cup from the kitchen.


Connect the Wheels
Add some hubcaps too!
Place each hubcap in the centre of each wheel, then connect to the car using a Scru+.
Be sure to leave enough room between the wheels on each side for a door.


The Doors
Cut and Fold
Use your Fold-Roller to score the outline of a door on each side of the car.
Cut along the angled and horizontal lines, then fold along the vertical line.


Making the Dashboard
Score, Fold and Connect
Use your Fold-Roller to score the outline of the dash, cutting at an angle on the sides of the box, then straight across the top.
Cut the folded edge of the box to the score line on each side, then fold the triangular side flaps inwards and the top of the dash down.
Attach the dash to the triangular flaps with a Scru on each side.


Add a Backrest
For extra comfort
To create the backrest, score a rounded edge at the back of the car, then fold down.

The Steering Wheel
Use a different cardboard source
Use your additional cardboard to trace and cut a circular shape (you might like to use the same object as the wheels for tracing).


Attach to the Dash
Getting the angle right
Cut a rectangular section to fit the dash, then score two lines at one-third and two-thirds of the way across.
Fold to create a raised centre and attach to the dash with two Scrus.
Finally, connect the steering wheel to the raised section with a central Scru.


Head and Tail Lights
Add some personality
Try to find some cardboard that is a yellowish colour for the front lights, and a red colour for the tail lights. If you don't have any in your cardboard collection, you can use markers or other materials to add detail.
Cut two small circles and attach them to the front of the car with a single Scru.
Repeat for the rear lights. You might like to experiment with different shapes, and even add some blinkers too!


Door Handles
Finishing touches
To make the door handles, cut four small rectangles, score and then fold through the centre.
Attach two handles to each door (one inside, one outside) with a Scru+.


Sporty Features
Adding a Spoiler
To make the spoiler (it is a race car, after all!) cut a rectangle the width of the car, then score and fold through the centre lengthways.
Create a bracket by cutting a smaller rectangle, then score at one-third and two-thirds along.
Attach the bracket to the spoiler, then connect the spoiler to the back of the car with two Scrus each.


Finishing Touches
Ready to race
You're all done... or are you?!?
What other details will you add to personalize your cardboard race car?